We use the ‘Cohesive Way’ to build and deliver the VNS3 Network Platform. We are not unique, but our approach helps us be distinctive.

Enterprise WireGuard® with Cohesive VPN Client

VNS3 6.0 Beta3 will be available in cloud marketplaces or upon request this week (contactme@www.cohesive.net). In our last post we showed how easy it is to connect your native WireGuard® clients to VNS3 6.0. In this post we show you how to use the Cohesive VPN Client to achieve the same goals like connecting to data centers or cloud VPCs/VNETs, and managing your own WireGuard® network connecting multiple people and devices. In addition, we will show an overview of using our enterprise capabilities like dynamic route updates, easy tunneling of all traffic with local subnet exceptions, and OIDC integration so you can authenticate your vpn users with Google Authentication, Okta, Auth0 and more.
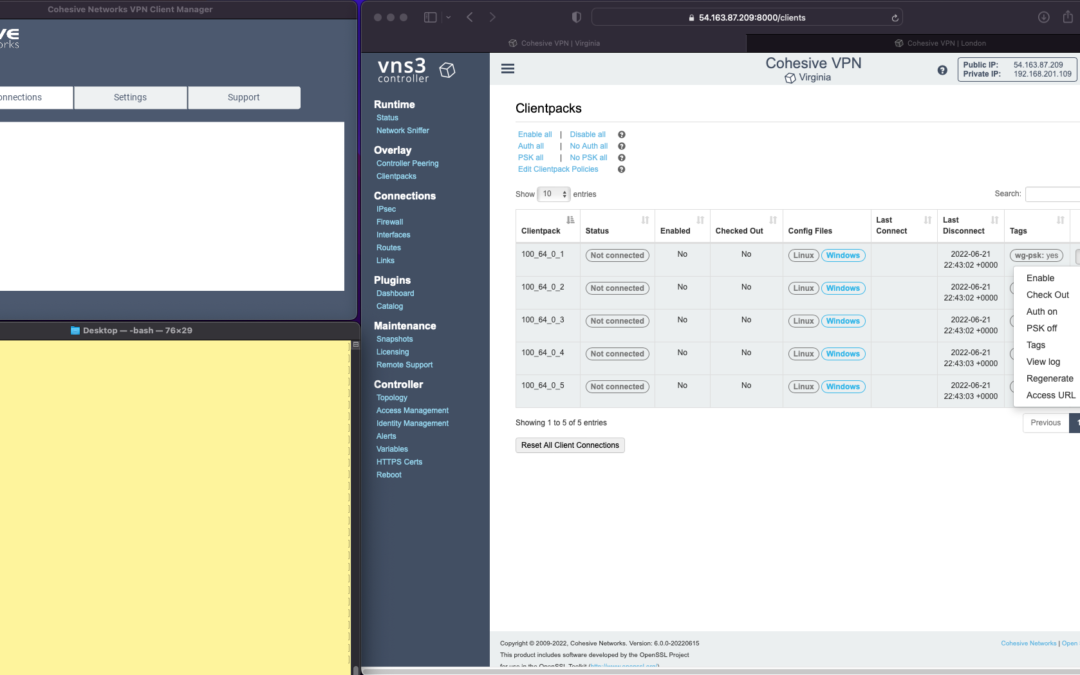
The screen shots throughout show three windows; upper left the Cohesive VPN client, bottom left a command line from the same Mac, and to the right the cloud-based VNS3 server.
VNS3 Network Platform has the concept of “clientpacks” – basically the credentials needed to connect a machine or a person to the network via a VPN client. Historically “clientpacks” have been “openvpn” by default. Starting in 6.0 clientpacks are WireGuard by default. In a future release we will support a dual stack with both “ovpn” and “wg” connections simultaneously, and a goal of IPsec clients as well.
In the picture above and those below we show the “Clientpacks” page. From this you can perform key administrative functions like disabling addresses, re-generating credentials, updating pre-shared keys, and getting access URLs for secure and easy distribution of VPN credentials.
Access URL


Above shows the results of choosing “Access URL” and displaying its result. This is a secure, one-time, timed URL allowing users to copy/paste the clientpack, download it for import, or use via a QR code on mobile devices.
It has all the necessary information to make a connection using the Cohesive VPN Client – with or without PSKs.
The commented lines are used by CNVPN CLI and GUI for additional enterprise support; failover, dynamic route updates, and OIDC authentication.
Copy/paste the clientpack into the Cohesive client via the “Paste” option, and choose Save.
Connect


Next choose “Connect” from the Cohesive Client’s “Actions” menu – and the VPN connection is created. The VNS3 Clientpacks page then shows the status as “connected”.
Below shows access to the VPN network by successfully pinging the VNS3 controller’s VPN address. (By default, this connection can access other addresses on the VPN. If that’s not desired it is easily changed via the Firewall page.)


You can use the Action menu on the VNS3 Clientpacks page to perform administrative operations. For example, if you select “Disable” on the connection, the client is dropped from the VPN.
Similar operations can be performed to re-new or re-secure a connection by adding a PSK or re-generating keys (both of which require the clientpack to be redistributed to the user or device). As expected, when you enable a PSK for the connection, the user is unable to access the network. With the credential re-deployed with the appropriate clientpack containing the PSK, they are back on the net!
To see some of those operations in action, take a look at our previous post. Cohesive’s target is to provide organizations the ability to deploy their own enterprise VPN infrastructure. This could be managed by Cohesive via our SecurePass offering, or self-managed. Regardless, our initial focus for 6.0 is managed, enterprise WireGuard.
Dynamic Route Updates
One of our key enterprise features is dynamic route updates. For “people vpns” you can usually just tunnel all traffic through the VPN – making the VPN adapter the default gateway. However, for IoT and machine2machine vpns, dynamic routing is a critical capability. You allow the device to have its own local gateway but when routes arrive dynamically, the traffic begins to follow that path. If the route is removed from the network, the default gateway is used.
In the example below the configuration is changed to have “RoutePolling = True”, and on the VNS3 controller a route to 55.55.55.55 has been advertised through the VPN. In the terminal window route display there is not yet a specific route to that public IP.
Once re-connected, the route to 55.55.55.55 through the VPN is visible on the client as a result of the dynamic route updating.
If that route is disabled or removed from the VPN network, then it is removed from the client.


Tunnel All Traffic
Tunneling all traffic through the VPN to the Internet is a snap with the Cohesive VPN Client.
Set the client parameter “TunnelAllTraffic” to “True” AND make sure you have enabled firewall directives on the VNS3 Server to send all VPN traffic out to the Internet.
VNS3 Free edition comes with a default set of rules in a group called “VPN2Internet. Go to the Groups view on the Firewall page and enable these rules.
This will direct all traffic from your VPN client to the Internet, getting its address translated to the Public IP of the VNS3 controller.
What if you still want to be able to access local network resources like a printer or file server? In that case, use the “LocalRoutes” option to enter a comma delimited list of the network CIDRs you want to exempt from the VPN so they can be reached locally.
Now that all traffic is being tunneled, from the command line the public IP 8.8.8.8 can be successfully pinged. To “prove” this traffic is going into the VPN we show it via our Network Sniffer.


VPN User Authentication
So far the examples have just used WireGuard protocol with unique keys and pre-shared key (PSK) for the connections. What about more specific user authentication? For WireGuard in VNS3 6.0 we use OIDC (Open ID Connect), and will add LDAP support in future. (Our dual stack offering in future will allow simultaneous use of OpenVPN and WireGuard clients, with your choice of LDAP/AD or OIDC).
With OIDC support you create a VPN users and/or admins application in your OIDC provider and then configure VNS3 integration.

Once the OIDC configuration has been saved you can login. In this case we are using our Google Apps login. When “Connect” is chosen, a login screen pops up in the default browser.

Upon entering the correct password the login panel indicates success and the VPN client connects!

Next up we will show using the Cohesive CNVPN CLI on a Linux machine. For cloud overlay networks and over-the-top cloud networking, the CLI is a powerful way to bring your enterprise feature set to your cloud and multi-cloud deployments.
(“WireGuard” and the “WireGuard” logo are registered trademarks of Jason A. Donenfeld.)


Recent Comments