Native WireGuard® Clients and VNS3 6.0 Beta2

Native WireGuard® Clients and VNS3 6.0 Beta2

VNS3 6.0 Beta2 is now available.

You can find the Free edition in both the Amazon and Azure marketplaces (GCP coming soon).

It is an easy way to get a server up and running that can connect you to data centers, cloud VPCs/VNETs, has a super firewall, straightforward support of even difficult things like “source based routing”, and most of all a quick way to run and manage your own WireGuard® network connecting multiple people, devices, or both.

This post will show you how to use the standard Mac Appstore WireGuard client built and delivered by the WireGuard team with Cohesive Networks VNS3 6.0 network controllers. (Of course similar capability is available using the same app from the Windows/iPhone/Android “app stores” as well.)

In future posts we will show the Cohesive CLI (cnvpn) at work, and the Cohesive WG GUI working with VNS3 6.0. And then we will follow up by showing how the different connection options work with a distributed VPN cluster where you can spread a VNS3 controller mesh across regions and clouds with ease, yet have a unified VPN system for management of credentials, pre-shared keys, OIDC sessions and more.

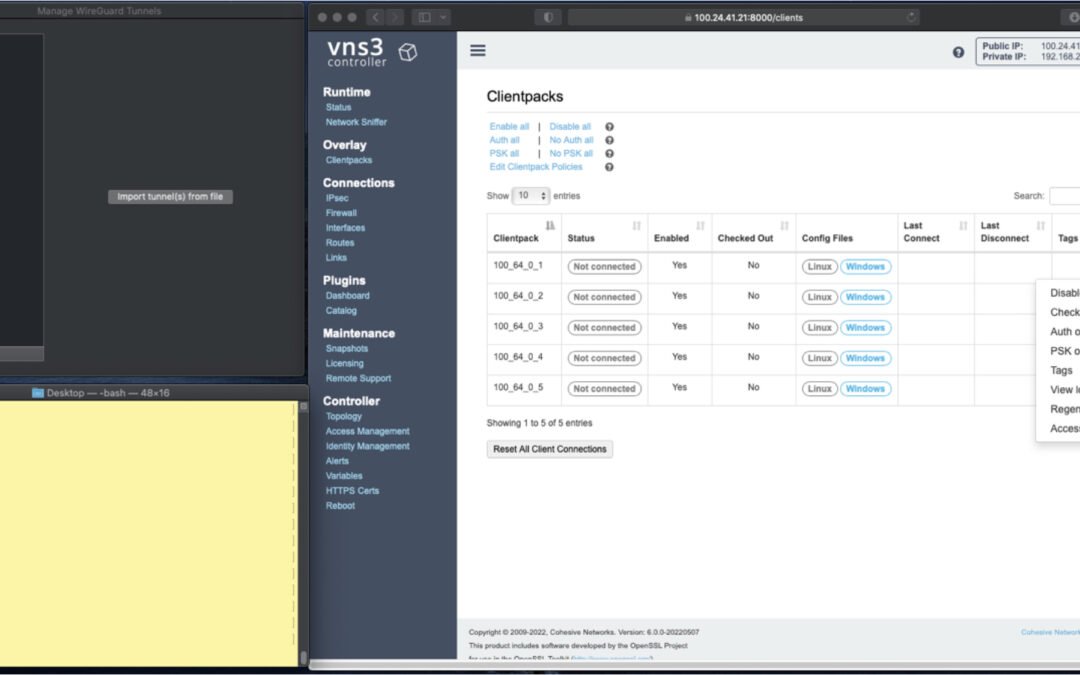
In the screen shots throughout we have three windows; upper left the Mac OS WG client, bottom left a command line from the same Mac, and to the right the cloud-based VNS3 server supporting a wide range of cloud networking use-cases, and here specifically WireGuard VPN connections.

VNS3 Network Platform has the concept of “clientpacks” – basically the credentials needed to connect a machine or a person via a VPN client to the network.  Historically they have been “openvpn” by default – and starting in 6.0 they are WireGuard by default. In a future release we will support a dual stack with both “ovpn” and “wg” connections simultaneously, and a goal of IPsec clients as well.

In the picture above and those below we see the “Clientpacks” page. From here you can perform key administrative functions like disabling addresses, re-generating credentials, updating pre-shared keys, and getting access URLs for secure and easy distribution of VPN credentials.

Above shows the results of choosing “Access URL” and displaying its result. This is a secure, one-time, timed URL which allows users to copy/paste the clientpack, download it for import, or for mobile clients use a QR code for import.

It has all the necessary information to make a connection using the standard WG Client – with or without PSKs.

There is also a series of commented lines which are used by CNVPN CLI and GUI for additional enterprise support (failover, dynamic route updates, OIDC authentication) to be discussed in future. For now we just want to focus on how easy it is to connect native WG clients.

Copy/paste the clientpack into the Mac OS client, and click SAVE/ACTIVATE.

Voilà – you are connected to the VPN.  The VNS3 Clientpacks page shows the status as “connected”.

The WG Client now shows its statistics about the connection, and below we are pinging the VNS3 controller’s VPN address to show access to the VPN network.

(By default, this connection can access other addresses on the VPN. If that’s not desired it is easily changed via the Firewall page.)  

If needed you can use the Action menu to perform administrative operations.   For example, if you select “Disable” on the connection, the client is dropped from the VPN.  Below, we see the client set to disabled state by the Admin, and we see the “pings” begin to fail.

Then we “Enable” – and the client is back on the network and packets begin to flow.

And of course similar operations can be performed to re-new or re-secure a connection by adding a PSK or re-generating keys – both of which require the clientpack to be redistributed to the user or device.  But as expected, when you enable a PSK for the connection, the user is unable to access the network.  With the credential re-deployed with the appropriate clientpack containing the PSK, they are back on the net!

Accessing the other devices on the VPN network is one use, what about getting to the Internet?

This requires a couple configuration elements on the client side which requires a little bit of operating system knowledge on the client side and a of couple firewall rules on the VNS3 Controller.  We won’t go into those specifics here.

But, if you look at the Cohesive-specific directives used by the CNVPN CLI and GUI – one of them is “TunnelAllTraffic” – and when this is set to “true” – all the client side magic is done for you!  But that is for another day.

(“WireGuard” and the “WireGuard” logo are registered trademarks of Jason A. Donenfeld.)


Distributed Hybrid MultiCloud Mesh with VNS3 and LNKe

Distributed Hybrid MultiCloud Mesh with VNS3 and LNKe

As cloud adoption continues to ramp up in 2022, with Gartner projecting another 21.7% growth in cloud spend this year, companies are maturing beyond their initial workload migrations to single cloud vendors. Whether to create resiliency due to the now not so uncommon major outages we have seen in the past few years, to tailor their many application environments to changing business requirements, or to migrate to new cloud vendors whose offering is the best fit. However, in order to realize these opportunities, companies need a consistent network layer that is uncoupled from any one cloud vendors specific dependancies. No matter which cloud you choose, achieving this goal requires utilizing third party network solutions. Such a solution should ideally facilitate connectivity to data-centers, remote users, and IOT devices as well.

Cohesive Networks VNS3 cloud edge security controllers can create the backbone across all of your public cloud vendors in an easy to manage and secure mesh, with LNKe connecting all of your virtual private networks. This gives you a fully transitive network across all of your cloud real estate, running at performative speeds with built in failover and self healing mesh capabilities. Granular IPSec cloud edge configurations allow you to connect corporate data centers, partner networks and vendor access, regardless of their hardware. Policy enforcement is consistent across the network and has been simplified for ease of management. With our comprehensive firewall you can easily define people, groups and network objects to allow your remote workforce to securely connect at the edge closest to their physical location. In short, with VNS3 and LNKe, you can create a full network mesh consistent with your needs that can grow to anywhere that you need to be and scale with your deploments.

Please reach out to the Cohesive Networks sales and solutions team at contactme@www.cohesive.net to further the discussion with any interests that you may have. We are always happy to help.

NATe: A Tax-Free Alternative to Cloud NAT Gateways

NATe: A Tax-Free Alternative to Cloud NAT Gateways

Whether you need to connect multiple cloud instances, communicate with the public internet from private resources, or directly connect to instances in local data centers, chances are you will be using Network Address Translation (NAT) to make that connection. All major cloud providers provide some product or service to provide NAT functionality, and some platforms even provide separate public and private variants. Because cloud instances running in private subnets are unable to access resources like time servers, webpages, or OS repositories without NAT functionality, most users find themselves relying on their cloud platform’s NAT offerings. By simply following their cloud providers’ recommended best practices, users are overpaying for an overcomplicated and inflexible service that a home cable modem does for free.  So why pay so much for such a simple network function?

If You’re Using Cloud Platform NAT Gateway(s), You’re Overspending on Cloud Deployments.

Overspending of any kind in the wake of the economic disruption caused by the COVID-19 pandemic can be deadly for any business. Yes, some have fared better than others during this challenging time but all organizations have revisited projections and budgets in the face of uncertainty. According to Gartner, the pressure is on for budget holders to optimize costs.

Pre COVID-19
54%
of enterprises planned IT budget increases
Post COVID-19
84%
of enterprises expect IT budget decreases

Where to Start?

Look to the sky! Your cloud bill is likely full of opportunities for savings, especially if your application relies on NAT functionality. Using AWS NAT Gateway pricing as an example, let’s start with the comparative base subscription costs:

  AWS NAT Gateway VNS3 NATe
Subscription $0.045 / hour $0.01 / hour*
Data Processing (TAX) $0.045 / GB $0.00 / GB
* Price includes runtime fees (on-demand t3.nano $.0052 / hr) + NATe subscription ($0.005 / hr)

As you can see from this example, the standalone subscription cost of an AWS NAT gateway is more than the cost of a single t3.medium instance. The already low VNS3 NATe subscription cost will provide you even more savings when you consider the fact that you don’t have to create as many individual NAT gateways, each of which would be  accompanied by an additional AWS NAT Gateway subscription. The cost differential here makes NATe an obvious choice at any deployment scale and we even offer a free NATe license for smaller deployments.

VNS3 NATe is also incredibly scalable because we don’t increase our data processing rates as your bandwidth needs scale.  Below is a pricing table that shows the total cost of running a single NAT Gateway vs a VNS3 NATe instance as the traffic throughput increases in a given month:

GB / Month AWS NAT Gateway VNS3 NATe
1 $32.45 $7.20
10 $32.85 $7.20
100 $36.90 $7.20
1,000 $77.40 $7.20
5,000 $257.40 $7.20
10,000 $482.40 $7.20
50,000 $2,282.40 $7.20
100,000 $4,532.40 $7.20

We also have customers who maintain 100s or 1000s of VPCs with NAT requirements of 1-100 GB per month.  Those enterprise cloud customer at scale have typically seen costs drop to 1/5 of what they would pay for AWS NAT Gateways.  To illustrate this savings, take the example from one of our customers has 1800 VPCs each with a NAT Gateway.  The total data processed through these NAT Gateways is low and averages 10GB / month with much more potential savings for deployments that pass more traffic out the NAT device.

AWS NAT Gateway VNS3 NATe
Monthly Runtime $58,320 Monthly Runtime $12,960
Data Processing (TAX) $810 Data Processing (TAX) $0
TOTAL PER MONTH $59,130 TOTAL PER MONTH $12,960
* Price includes runtime fees (on-demand t3.nano $0.0052 / hr) + NATe subscription ($0.005 / hr)

Total NATe saving per month in this case is $46K and $554K per annum.

Of course, costs savings are not limited to just NAT Gateway spend.  Other opportunities for savings include right sizing instances (latest generation instance families are always less expensive), decommissioning unused services/resources (I’m looking at you load balancers), and reviewing storage strategies (such as EBS).

What is a NAT Gateway?

A NAT Gateway is a network service that performs a simple network function: Network Address Translation for cloud-based servers running in a private network (private VPC subnet). Here is the AWS documentation detailing the NAT Gateway functionality. NAT Gateways perform a specific type of NAT called IP Masquerading, where devices in a private IP network use a single public IP associated with the gateway for communication with the public Internet.

This is the same function that your home modem performs for free. You’re likely leveraging this NAT functionality as you read this post. Basically the NAT functionality on a NAT Gateway or your home modem allow devices on a private network (computers, phones, TVs, refrigerators, toothbrushes, etc. in the case of your home network) to access the Internet and receive responses but not allow devices on the public Internet to initiate connection into your private network. All traffic sent from the private network to the public Internet uses the modem’s public IP address.

NATe to the Rescue!

In response to direct requests by our customers, we created a low-cost, instance-based alternative to NAT Gateways – VNS3 NATe.

Available on AWS PM and Azure MP today:

* No subscription premium but total throughput limited to 50mbps

What is a NATe?

NATe instances are drop-in replacements from Cohesive Networks for NAT Gateways. Simply launch in a VPC/VNET subnet with an Internet Gateway associated, Stop Src/Dst checking (enable IP forwarding), and update the Route Tables associated with the private Subnets to point 0.0.0.0/0 destinations at the NATe instance-id.

Cohesive-Networks_NATe-Network-Diagram_20210318

NATe provides all the functionality of a NAT Gateway plus enterprise grade security and controls at a fraction of the cost. Some of the functional highlights of NATe include:

  • High Performance – run on the smallest instance sizes to maximize value or larger instance for greater total throughput
  • Secure – access to a firewall to allow additional and orthogonal policy enforcement for traffic flows
  • Control – access logs, network tools like tcpdump, status information
  • Customize – leverage the Cohesive Networks Plugin system to add L4-L7 network services to the NATe instance like NIDs, WAF, Proxy, LB, etc.
  • Automate – fully automate the deployment of VNS3 NATe instances as part of your existing deployment framework leveraging the RESTful API to reduce implementation costs.
  • Failover – NATe can be configured in a number of HA architectures to provide the same level of insurance needed for critical infrastructure via instance auto recovery, auto scale groups, and Cohesive Networks’ own Peering and HA Container functionality
  • Upgrade – NATe is fully upgradeable to fully licensed VNS3 controllers deployed as a single application security controller or part of secure network edge mesh

Still Not Convinced?

Cohesive’s NATe offers a dramatically more cost-efficient solution to often critical NAT requirements in cloud deployments of all shapes and sizes. NATe is more flexible, more scalable, and easier to manage than first-party cloud NAT gateways that are charging you a premium for the functionality of a standard consumer modem. If you don’t believe us, we launched a free version of our NATe offering in both the AWS and Azure marketplaces so you can launch and configure them and see for yourself!

Have questions about set-up or pricing? Please to contact us.

Quick overview of Azure Defense in Depth

Quick overview of Azure Defense in Depth

Layers of security bolster defenses for any application, database, or critical data. In a traditional data centers, physical network isolation meant building walls for physical security. For cloud, the providers – AWS, Azure, and others, build the walls, fences and comply with things like ISO 9000. This is the provider-owned and complexly provider-controlled security they provide to users.

Up the cloud stack, users can add and more layers of defense at the virtualization layer by creating logical segmentation, and at the application layer with application segmentation. Three key ways to add network security users can access provider-owned, user-controller features like VLAN isolation, port filtering, and static assignable public IP addresses.

Public cloud providers allow users to control certain features and services, but ultimately own the feature. The cloud user is responsible for setting up, maintaining and updating these features. One example is port filtering on the host operating system. Port filtering prevents packets from ever reaching a virtual adapter. hypervisor firewall through network mechanisms such as security groups or configuration files. Users can limit rules to only allow ports needed for each application.

In Azure, you can use the following Azure-provided, user-controlled features:

  • Azure Multi-Factor Authentication
  • Privileged Access Workstations (PAW )
  • Azure Role based access control (RBAC)
  • Network Security Groups (NSGs)
  • Azure Key Vault
  • Azure Disk Encryption
  • Security Center monitoring and compliance checking

Azure provider-owned/User Controlled Security

  1. Use Azure identity management and access control for each application (like AD), enable password management and create multi-factor authentication (MFA) for users
  2. Use role based access control (RBAC) to assign privileges to users
  3. Monitor account activity
  4. Add and control access to each Resource

View and Add access to each Azure Resource and Resource group

  • Select Resource groups in the navigation bar on the left.
  • Select the name of the resource group from the Resource groups blade.
  • Select Access control (IAM) from the left menu.

The Access control blade lists all users, groups, and applications that have been granted access to the resource group.

  • Select Add on the Access control blade.
  • Select the role that you wish to assign from the Select a role blade.
  • Select the user, group, or application in your directory that you wish to grant access to. You can search the directory with display names, email addresses, and object identifiers.
  • Select OK to create the assignment. The Adding user popup tracks the progress. After successfully adding a role assignment, it will appear on the Users blade

Azure Networking Security

Azure offers several networking security services:

  • Azure VPN Gateway
  • Azure Application Gateway
  • Azure Load Balancer
  • Azure ExpressRoute (direct connection through ISP)
  • Azure Traffic Manager
  • Azure Application Proxy

More on Network Access Control

Network access control is the act of limiting connectivity to and from specific devices or subnets within an Azure Virtual Network to ensure your VMs and services are accessible to only users and devices you control.

  • Network Layer Control – basic network level access control (based on IP address and the TCP or UDP protocols), using Network Security Groups. A Network Security Group (NSG) is a basic stateful packet filtering firewall and it enables you to control access based on a 5-tuple. NSGs do not provide application layer inspection or authenticated access controls.
  • Route Control and Forced Tunneling – customize routing behavior for network traffic on your Azure Virtual Networks by configuring User Defined Routes in Azure.
    Forced tunneling = ensure services are not allowed to initiate a connection to devices on the Internet. All connections to the Internet are forced through your on-premises gateway. You can configure forced tunneling by taking advantage of User Defined Routes.
  • Network Security Groups = contains a list of access control list (ACL) rules that allow or deny network traffic to your VM instances in a Virtual Network


Next up, use your user-provided, user-owned features to add application layer security.

Services like SSL/TLS termination, load balancing, caching, proxies, and reverse proxies can also add application-layer security. Additionally, tailoring security policies to each application can be more effective than applying complex, blanket security policies across multiple applications.